7061
Reincarnated.1754
Right-click Here, chose "Save Target As" to DownLoad the Zip file, save to disk, Un-Pack and Run Setup
If you have a version before 600, you need to un-install that one first, using add/remove programs.
Main
Screen-shot
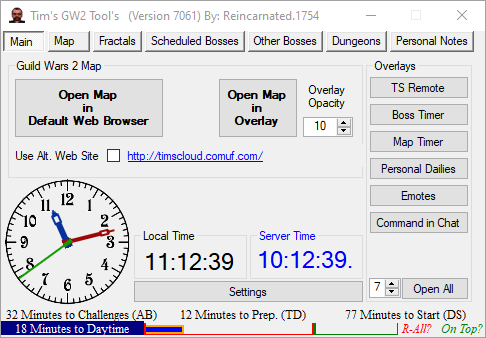
The Main Tab is where you can start other applications within this app.
This is very useful if you have 2 monitors connected to your computer.
Click on this button to show your location a Guild Wars 2 Map in your default Web Browser.
If you only have 1 monitor, there is a Map Overlay.
This is a Web Browser that will work on top of your Game Screen
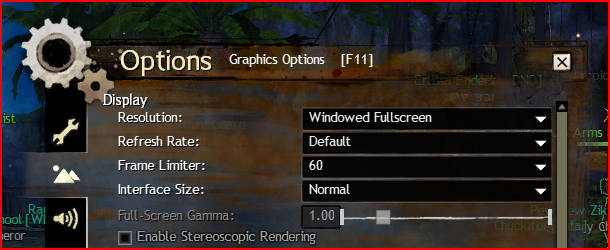
Providing the Graphic Settings are set to Full Screen Window Mode, as described before.
This will change the Opacity of the Map Overlay.
On the right there are buttons to start other Overlay(s).
The button at the bottom will open all of the above.
The number next to the button changes the Opacity.
The overlays only work if you have the game graphic setting set to Windowed Full screen.
See Section on Overlays bellow for more details.
At the bottom there are Timers (These are always visible).
15 Minute Timer, In-Game and Map Event Times.
The 15 minute Timer resets every time a Boss is scheduled.
The In-Game Time Of Day Indicates if it is Day or Night in the game, and when Day/Night will change.
The Map Timers Indicate crucial times for events.
Also at the bottom is R-All?
Click this to Reset all Tab Pages (Everything)
The Settings Button will change this page to the Settings Page.
Screen-shot
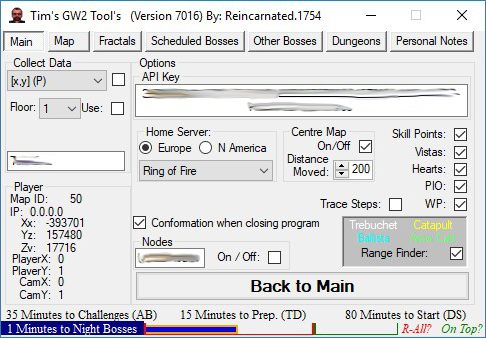
The first thing you must do is set your Home Server.
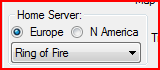
This is necessary for when you are in WvW so that the correct map is shown.
Most of this page is just Information and Options.
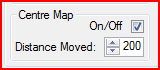
This Option keeps the Map centered on Your Position, the value entered in Distance moved determines how far you can move before the Map is centered.
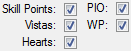
Chose what to show on the Map. (This option needs a Page Refresh, or will take effect next time you change map)
With this Option Ticked you will leave a Trace as you move around the Map.
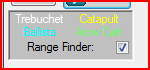
When in WvW and at the correct Zoom. You will see Range Finder Rings around your Location.
White = Trebuchet.
Yellow = Catapult.
blue = Ballista.
Green = Arrow Cart.
Click on the Link to see an Example.
WvW Example 1
This Next Link shows WvW zoomed out a little to show Who has which Objective and if the Objective has been Claimed By a Guild or if the Objective has Righteous Indignation.
WvW Example 2
This one you need to enter a Phrase/Word to activate it.
I done this because I am trying to get in touch with the person who done this site GW2 Nodes. To see if they are OK with it?
Basically my Map looks at GW2 Nodes Map and puts all the Node locations on my Map.
Click on the Links to see Examples.
Nodes Example 1
Nodes Example 2
Depending on which Web Browser you use, clicking on the Link in the Map will also copy the required IP address to your Clipboard.
Click this to take you back To the first Page of the Main Tab.
Map
Screen-shot

I hope the Drop-down Selection boxes are self explanatory, you can chose 1 or ALL, from a list of Type of Location.
Click on the following Links to see Examples:

Bounty Example 1
Bounty Example 2

Trek Example

Rush Example 1
Rush Example 2

Chests Example
(The above Map has no content, it is just a basic example. When the Map is Opened from the Program it will be filled with the choices you have chosen)
Fractals
Screen-shot
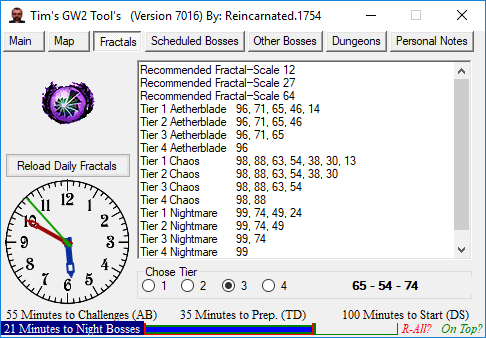
This shows the Day's Daily Fractals.
They are arranged in an easy to see order.
This button Reloads the Data from the API
You should only need to use this if there is issues with the Internet connection or the API server, and the process to get the data has timed out.
There is an option to chose the Tier you wish to do and it will show the minimum fractals to do.
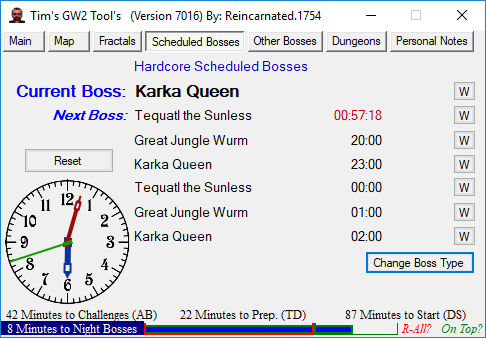
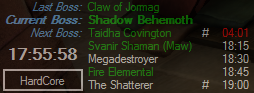
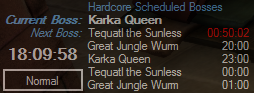
Scheduled Bosses
Screen-shot
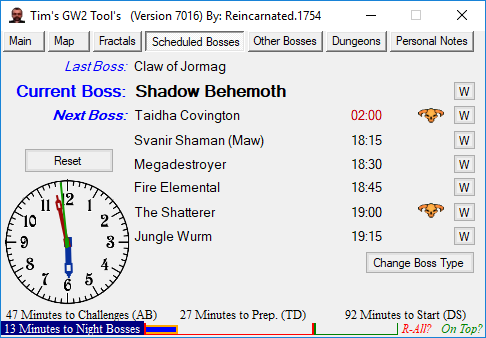
This is how the program started off, as just a list of Scheduled Bosses, with an option to mark off the ones done each day. As friends started to use it they asked for more and so it has now evolved into a nice little tool to keep track of things done each day and help with some events.
Also there is an Interactive Map to Help and Guide you with Events and Achievements.
At this Time I would like to draw you attention to the On Top? in the bottom right corner.
Click on this to change the text to Redor Green.
If the text is Green, then this program window will stay on top of other open windows.
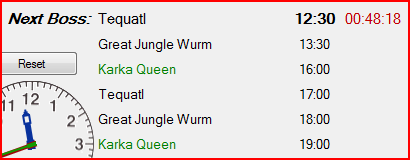
The List has four parts, Last Boss, Current Boss, Next Boss And those to come.

The Last boss can be clicked with the Left-Mouse Button to set that Boss as done.
Doing this will change the Text Colour to Green, indicating this.
(Click with the Left-Mouse Button again to return the Colour to normal, if you make a mistake)

The Current Boss can be clicked with the Left-Mouse Button to set that Boss as done.
Doing this will change the Text Colour to Green indicating this.
(Click with the Left-Mouse Button again to return the Colour to normal, if you make a mistake)
The Current Boss can be clicked with the Right-Mouse Button to copy the Name and WP Info into the Clipboard.
(You will not notice anything when you click with the Right-Mouse Button on the Current Boss)
After clicking with the Right-Mouse Button on the Current Boss activate the In-Game Chat Box in the In-Game Chat Window and press Ctrl+v to paste the contents of the Clipboard into the In-Game chat box, then press Enter.
This should show in In-Game Chat Window the name of the Boss and the WP Location Link.
You can now click on the WP Location Link to go directly to that Boss Location.

The Next Boss can be clicked with the Right-Mouse Button to copy the Name and WP Info into the Clipboard.
(You will not notice anything when you click with the Right-Mouse Button on the Next Boss)
After clicking with the Right-Mouse Button on the Next Boss activate the In-Game Chat Box in the In-Game Chat Window and press Ctrl+v to paste the contents of the Clipboard into the In-Game chat box, then press Enter.
This should show in In-Game Chat Window the name of the Boss and the WP Location Link.
You can now click on the WP Location Link to go directly to that Boss Location.
The Next Boss shows the Time the event becomes Active.
Also the Next Boss shows a 15 minute Countdown.
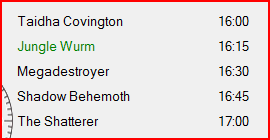
After the Next Boss are listed five more Bosses to come, showing there Scheduled Time.
The Scheduled Bosses can be clicked with the Right-Mouse Button to copy the Name and WP Info into the Clipboard.
(You will not notice anything when you click with the Right-Mouse Button on the Scheduled Bosses)
After clicking with the Right-Mouse Button on the Scheduled Bosses activate the In-Game Chat Box in the In-Game Chat Window and press Ctrl+v to paste the contents of the Clipboard into the In-Game chat box, then press Enter.
This should show in In-Game Chat Window the name of the Boss and the WP Location Link.
You can now click on the WP Location Link to go directly to that Boss Location.
You will see some Scheduled Bosses have an Icon adjacent to them.
This indicates that a Hardcore Boss is also Scheduled at the shown Time.
Button Labeled Reset.
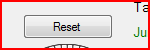
This will Reset all Bosses on this page.
Buttons labeled with a "W".

Clicking on this button will open the GW2 Wiki web page about the event.
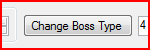
The Change Boss Type button, Changes the page between
Normal Scheduled Bosses and Hardcore Scheduled Bosses.
And Vice-versa.
Screen-shot
The Hardcore Boss list does not show the last Hardcore Boss

The Current Hardcore Boss will be listed for the first 15 minutes.
After that it will say Over 15 minutes.

Indicating that it has been over 15 minutes since the event started.
All listed Hardcore Bosses except Current Hardcore Boss:
Can be clicked with the Left-Mouse Button to set that Hardcore Boss as done.
Doing this will change the Text Colour to Green indicating this.
(Click with the Left-Mouse Button again to return the Colour to normal, if you make a mistake)
Can be clicked with the Right-Mouse Button to copy the Name and WP Info into the Clipboard.
(You will not notice anything when you click with the Right-Mouse Button on the Hardcore Boss)
After clicking with the Right-Mouse Button on the Hardcore Boss activate the In-Game Chat Box in the In-Game Chat Window and press Ctrl+v to paste the contents of the Clipboard into the In-Game chat box, then press Enter.
This should show in In-Game Chat Window the name of the Hardcore Boss and the WP Location Link.
You can now click on the WP Location Link to go directly to that Hardcore Boss Location.
Other Bosses
Screen-shot
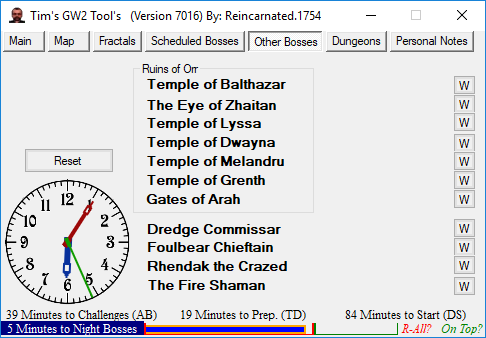
This is a list of other World Bosses
(These bosses are not scheduled and can happen at any time of the day)
All listed World Bosses:
Can be clicked with the Left-Mouse Button to set that Hardcore Boss as done.
Doing this will change the Text Colour to Green indicating this.
(Click with the Left-Mouse Button again to return the Colour to normal, if you make a mistake)
Can be clicked with the Right-Mouse Button to copy the Name and WP Info into the Clipboard.
(You will not notice anything when you click with the Right-Mouse Button on the Hardcore Boss)
After clicking with the Right-Mouse Button on the Hardcore Boss activate the In-Game Chat Box in the In-Game Chat Window and press Ctrl+v to paste the contents of the Clipboard into the In-Game chat box, then press Enter.
This should show in In-Game Chat Window the name of the Hardcore Boss and the WP Location Link.
You can now click on the WP Location Link to go directly to that Hardcore Boss Location.
Buttons labeled with a "W".
Clicking on this button will open the GW2 Wiki web page about the event.
Button Labeled Reset.
This will Reset all Bosses on this page.
Dungeons
Screen-shot
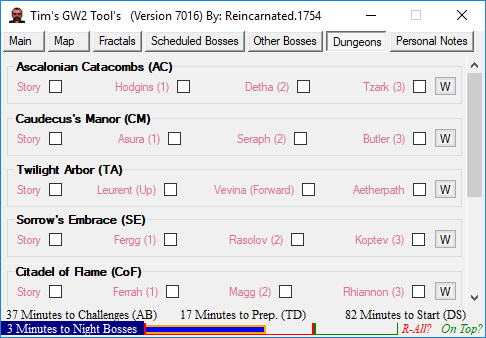
This is a list of all the Paths in each of the Dungeons
Each one can be Ticked off as done with the Left-Mouse Button.
(Click with the Left-Mouse Button again to remove the Tick, if you make a mistake)
In the Game there is no way to tell which Path you have done for the first time in each Dungeon.
(To get the Achievement).
So the first time you Tick a Path it will turn the text Blue.
(With the Path Not Ticked Click with the Right-Mouse Button to return the Colour to Red, if you make a mistake)
The Name of the Dungeon can be clicked with the Right-Mouse Button to copy the Name and WP Info into the Clipboard.
(You will not notice anything when you click with the Right-Mouse Button on the Name of the Dungeon)
After clicking with the Right-Mouse Button on the Name of the Dungeon activate the In-Game Chat Box in the In-Game Chat Window and press Ctrl+v to paste the contents of the Clipboard into the In-Game chat box, then press Enter.
This should show in In-Game Chat Window the name of the Name of the Dungeon and the WP Location Link.
You can now click on the WP Location Link to go directly to that Dungeon Location.
Buttons labeled with a "W".
Clicking on this button will open the GW2 Wiki web page about the event.
Button Labeled Reset Paths.

This will Reset all Paths on this page.
Personal Notes
Screen-shot
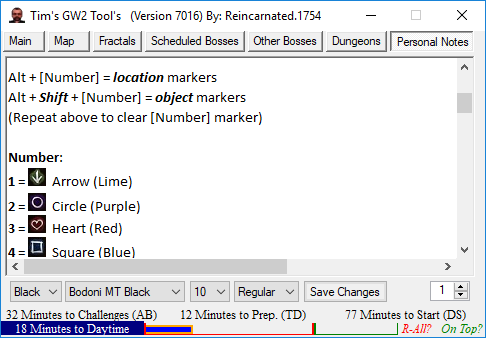
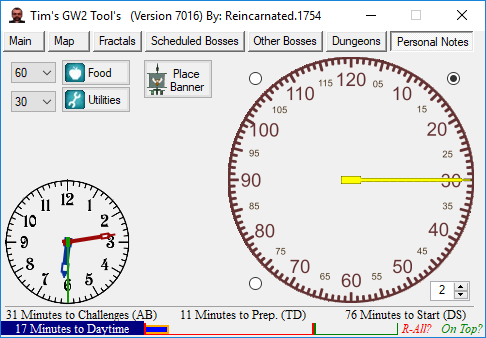
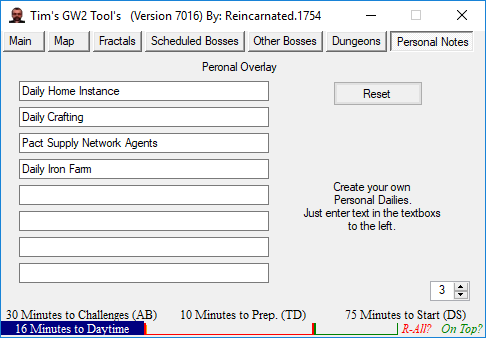
Personal Notes has Four pages.

Change the Number in this box to change the Page.
Page 1 Is a Basic Text Editor.
When you save changes to the text, it saves it to a file called Tims_Event_Tracker.rtf in your Documents folder.
(Because the editor is so basic it has a little bug. If the Font selected does not have the full set of styles, e.g. Regular, Bold and Italic the program may give an error when starting, if this happens, just change to a different Font and restart the program.)
Page 2 Is to help keep track of things in WvW.
Basically this is just a timer for Buffs.
Banners, Food and Utilities.
Page 3 Is Where you can add custom Personal Daily things to check off each day.
This is where you add text to the Personal Dailies Overlay.
When you have done your daily, just click the text on the overlay, and that daily disappears.(reset brings them all back)
Page 4 Is Work in Progress. and a few useful links
Logitech
Mono
LCD
Mono
LCD
Screen-shot
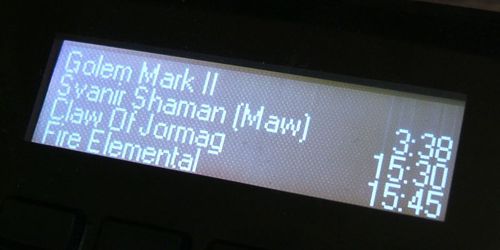
If you have a Logitech Keyboard with the Mono LCD
It should display Boss Times.
When pressing the buttons, you may have to actually hold it for about a second.
I set the feedback response to 1 second, so as it uses very little resources.
I only have a Keyboard with a Mono LCD,
so I don't know what happens with the ones with a colour LCD. :)
It should display Boss Times.
Button 1. Switches it to Normal Scheduled World Bosses.
Button 2. Switches it to Hardcore Scheduled World Bosses.
(Press the same button again gives a second page. Or back to the first page.)
Line 1. Shows the current Boss. (in the case of Hardcore Bosses the Over 15 Minutes apply)
Line 2. Shows the Next Boss, the time shown is minutes : seconds until the event is active.
for Hardcore Bosses, it will be hours : minutes : seconds until the event is active.
Line 3. Shows the Next Boss, the time shown is the Time of Day the event will be active.
Line 4. Shows the Next Boss, the time shown is the Time of Day the event will be active.
When pressing the buttons, you may have to actually hold it for about a second.
I set the feedback response to 1 second, so as it uses very little resources.
I only have a Keyboard with a Mono LCD,
so I don't know what happens with the ones with a colour LCD. :)
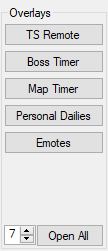
Overlays
Screen-shot
Screen-shot
Normal Bosses View
Hardcore Bosses View
Hardcore Bosses View
TS Normal View
Map Timer Single View

Map Timer 5 View
Command In Chat
There are 6 utility Overlays at the moment: Boss Timer, TeamSpeak Remote, Map Timer and Personal Daily, Emotes, Command in Chat.
The Boss Timer works the same way as the Main Program.
The TeamSpeak Remote Shows your status: muted/not-muted, Redwhen sound is active and yellowwhen silent.
Shows the last 4 people that was speaking and there status: Redwhen sound is active and yellowwhen silent.
below the list of the last 4 people speaking/spoken, is any Text messages.
Moving your Mouse over the Overlay Gives you more options: you can Mute people, you can change Channel, see all in Channel, send Text Chat.
When you move you mouse over the Overlay there is a large Mute/Un-Mute button. To enable this Button you need to add a Hot-Key in TeamSpeak, set the "toggle microphone mute" to Ctrl+M.
TeamSpeak now has an API Key that third party programs need to know.
To find this key: Click tools on the menu bar and choose Options.
In the Options window; Click Add-ons.
At the top of this window will be tabs, select the Plug-ins Tab.
In the ClientQuery box the will a settings button. Click it.
Copy the API Key
Move your mouse over the TS Remote Overlay and click Main.
The Main window will appear, paste the API Key in the box above Text Chat box.
Close and restart TS Remote Overlay.
Command in chat, Enables you to chose 10 from hundreds of pre-typed messages, that you can send in chat with a click of a button.
Also enables you to choose from a selection of messages to broadcast while in a squad.
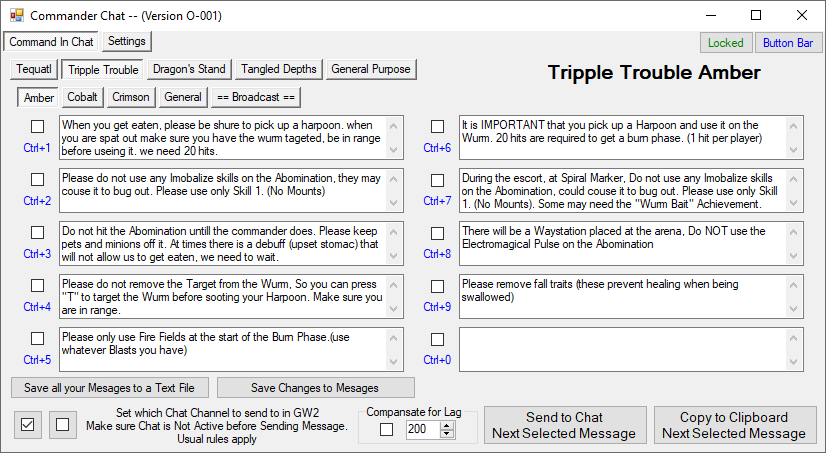
Here is the main window, it currently shows: TrippleTtrouble -> Amber, Selected.
When a page is selected, the 10 text boxes are allocated to 10 keys on the keyboard: they are Left Control plus a number along the top of the main key set. (Ctrl+1 to Ctrl+0)
The messages do not have to be ticked when using the control buttons. Putting a tick in the boxes is only required when using one of the buttons on the main application.
If you change tab page the keys will be relocated to what ever is on the current selected page.
On each main tab page there is a ==Broadcast== page, this should not be used when not in a squad. you also need broadcast message privileges when in the squad.
At the top right there are two buttons for a 10 button bar overlay, one is to show the overlay, the other is to lock its position on the screen. (Green = Locked, Red = Unlocked)
When the Button Bar overlay is unlocked, there will be an M visible to the left of the bar, (mouse over the overlay) grabbing this will enable you to move it where you want it.
Clicking the "Button Bar" button to show the overlay, will also minimize the main window. (you can bring back the main window from your taskbar, or clicking the overlay button in the main application)
Emotes is a drop-down list of Emotes.
If you are like me, and slow at typing. clicking an Emote from the list will type it in chat for you.
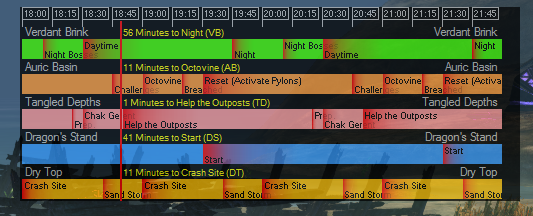
The Map Timer shows the start of Special periods, Meta Events Times on 5 maps.
It can be sized to show 1 map or all 5 maps.
The Maps it shows are: Verdant Brink, Auric Basin, Tangled depths, Dragon's Stand and Dry Top.
To set what is shown in the Personal Daily Overlay, go to page 3 in the Personal Notes Tab.
It shows an Overlay looking similar to the games Dailies.
Error
Map
Not Show
Correctly
In
Web Browser
Map
Not Show
Correctly
In
Web Browser
Screen-shot

A known error / Bug
my program cannot cope with some incomplete set of Fonts.
If you get and error when the program first starts, continue, then when the program is loaded,
go to Personal Notes and change the selected Font to something common. Then restart the program.
I hope to sort this in the future
Some Browsers won't rotate the Character and View correctly.
I have noticed that Microsoft Edge (web browser) does not refresh the updated "Tile Service" very well.
I some times have to clear Cached data and files.
(...) => Settings => Clear browsing data [Choose what to clear] tick "Cached data and files" [Clear].
If you use this and think you have found any bugs or errors, please let me know.
My In Game Name is top left of page.
Work In Progress
Screen-shot
Need lots of people to ask Arenanet to update the Tile Service.
Things I am still working on:
I'll try to add things when i have the time.
Guild Challenges.
Highlighting Gates and Breakable walls in WvW.
Collection Items for Achievements (will do more if more are added).
Festival Items locations (I work on this during a Festival)
Special Event Guides (This a bit of an Oddball, I have been able to move a lot of stuff I had here, a lot of it got automated)
You may want to refresh the Map on a daily basis. I'm always updating it and trying to improve it.
Things I recently done (reason for update):
I haven't done much in a long while.
This is because ArenaNet have not updated the Tile Service in a long time.
I have decided to make my own Tiles for the new maps and have recently started updating things.
(August 2020)
Added Command in Chat overlay to my main Application.
Started updating achievements.
(July 2020)
Made Tiles for new maps.
(23/11/2017)
Done A few things and still working on it.
Don't know if anyone uses it, had no feedback, so I work on it when I can.
Re-done web page.
(30/09/2016)
You may have to uninstall previous version (if it don't run after updating, it's a definite yes).
Added Mini Dungeon Options.
Removed Weekly, with many updates to GW2, there was no use for it any more.
(23/07/2016)
Had to reinstall my PC, had to upgrade to a newer Installer.
You must uninstall any version before 600 First.
sorry.
Fixed the address to correct web page in Map Overlay.
(02/05/2016)
Added Personal Daily Page and Overlay
(17/03/2016)
Fixed Times of bosses (Didn't know I got it wrong for different time zones until clocks changed :))
(17/03/2016)
Changed Internet Host, Web address has changed. http://www.timscloud.uk/GW2/Manual/Manual.html
(29/02/2016)
Now Shows Location of Pets for Rangers. (Still have a couple to add. Have not done the Mists locations)
(18/01/2016)
Changed it so you can have more than 1 Overlay open at a time.
(28/12/2015)
Changed the Overlay. It now has a choice of 3.
Boss schedule, Teamspeak Remote and HoT Map Meta Event Times.
May need to un-install previous version 1st.
May do some manual for the TS Remote at a later date, it's very basic so I'm sure you can figure it out.
(19/11/2015)
Added some timers for Heart of Thorns maps.
(27/10/2015)
Done some refinement for Heart of Thorns.
Right clicking Show Check-boxes in map section when single item is selected, now copies WayPoint location(s) to Clipboard.
(17/08/2015)
Added Events to Dry Top.
Blue = 1 minute warning to events about to start in the next 5 minute period.
Orange = Events active in the current 5 minute period.
(02/08/2015)
Both Application and web page was accessing Map API at the same time, this led to location conflicts when Internet connection was lagging.
Only web page accesses Map API now.
(27/06/2015)
Changed the Engine the Overlay Browser uses,
instead of MS Internet Explorer, it now uses the Chrome engine.
(This I am afraid has increased the download file size dramatically,
there goes that 20 meg. I saved previously. It runs Java script much better.)
Also I have changed the Installer, Instead if using the One-click Installer,
it now uses one that lets you install the files where you want.
(18/06/2015)
Added Map Overlay.
(06/06/2015)
Added Widget for Logitech's Mono LCD.
(03/04/2015)
A few little errors with that last update, think i have it sorted now.
(31/03/2015)
Updated Due to latest GW2 update.
Put a lot of images used in the application on the web so the installed file for the application have been reduced by about 20 meg.
Now any updates to the web part of the application are updated automatically on site no need to download new stuff for that side of things.
Now the only time you need to download an update is if I make changes to the windows application part.
Added GMT Time to aide in setting correct Time Zone. (well I hope it's GMT. I need some feedback from some one in an other country to see if I got it Right :) ).
WP's now get copied to clipboard when choosing some Guild Missions and Jump Puzzles.
Jump puzzles. (Some are a bit hard to follow due to them overlapping a lot.)
Skritt Burglar locations. (Checked quite a few of them, but some I used GW2 API To get locations)
Collection Items for Achievements (you may need to use some other guides to help with the complicated locations).
Things I am thinking about adding:
Standard Siege locations in WvW.
Have been asked to do other languages, but this would be a lot of work.
What I would like to see ArenaNet add to the API.
Mercenary Camps and Sentry WvW Objective Status.
Add Contested status to WvW Objectives.
I did this program because I love Playing GW2.
Programing is what i love to do and I enjoy adding things that help me with the game.
This is all Work In progress, so if you find any bugs, something that doesn't seem to work or have any suggestions, let me know :)
If you use this program, I hope you enjoy it.
have fun in the game.
BTW the title has (Work In Progress Number)
(The bigger the number, the newer the version, I put the current number top right of this web page.)
If I have increased the work in progress number by 100, this is because any previous versions needs un-installing first.
Don't Treat it as a commercial program, I'm just a Guild Wars Player.
I am always working on it so check this web page regularly (refresh the page to make sure it is current), and I welcome feedback.